Pages

Showing posts with label Daring Kitchen. Show all posts

Wednesday, August 22, 2012

Roasted Tomato, Onion and Mushroom Pie or The Daring Cooks’ August, 2012 Challenge: Cornmeal

There's so much you can do with cornmeal, Rachael of Pizzarossa was our August 2012 Daring Cook hostess and she challenged us to broaden our knowledge of cornmeal! Rachael provided us with some amazing recipes and encouraged us to hunt down other cornmeal recipes that we’d never tried before – opening our eyes to literally 100s of cuisines and 1000s of new-to-us recipes!

I was late doing the challenge and fell back on a tried and true family favorite. I have called it a pie even though there is no pastry

Roasted Tomato, Onion and Mushroom Pie with Herb Salsa.

2 tablespoons olive oil
2 tablespoons chopped basil
1 large onion
5 roma tomatoes
4 or so mushrooms

4 cups vegetable stock
1 cup polenta
1 teaspoon white pepper
1 teaspoon salt
1/4 cup grated parmesan
1/2 cup grated cheddar

Salsa

1/4 red capsicum
1/2 lebanese cucumber
2 ripe roma tomatoes
3 green spring onions
1 cup chopped fresh coriander
1 cup chopped flat leaf parsley
1/2 cup chopped basil or 2 tablespoons basil paste
1/4 cup thai sweet chilli sauce
1 tablespoon white wine vinegar
Salt and Pepper

Mix the oil and basil together and pour into the base of an oven proof dish.
Cut the onion into 12 wedges. Spread the onion over the oil.


Cut the tomatoes in half and spread over the top of the onion.
Fill the holes with the mushrooms.


Roast at 150 ° Celsius for 60 minutes.


Bring 4 cups of vegetable stock to a rolling boil and stir in 1 cup of cornmeal. Keep stirring until the mixture thickens.
Add 1/4 cup grated parmesan, 1 teaspoon white pepper and 1 teaspoon of salt

Spoon over the roasted vegetables and top with the grated cheddar.

Place under a hot grill until the cheese is bubbly and golden.


Finely chop all the herbs, cucumber, tomatoes, capsicum. Mix with the sweet chilli sauce and vinegar. Add salt and pepper to taste and refrigerate until required


Cut into 1/4's and turn out onto the serving plates and top with a large spoonful of the salsa.


Sunday, July 29, 2012

The Daring Bakers’ April 2012 challenge _ Nutmeg Cake


The Daring Bakers’ April 2012 challenge, hosted by Jason at Daily Candor, was two Armenian standards: nazook and nutmeg cake. Nazook is a layered yeasted dough pastry with a sweet filling, and nutmeg cake is a fragrant, nutty coffee-style cake.


I have just got to this challenge. Sort of. I haven't had a go at the Nazook but you can see it on Jason's blog.
I made the nutmeg cake back in April and several times since. The cake is amazing. It has become a family favorite. I did have to fiddle with it a bit to take out the egg.  I have made it with the banana and without the banana and the egg, both times it worked wonderfully.

Armenian Nutmeg Cake

Equipment
1 large bowl
1 large cup
Measuring spoons/cups
springform pan (9”/23cm)
food processor

Ingredients


1 cup (240 ml) milk
1 teaspoon (5 ml) (5 gm) bi-carb (baking) soda
2 cups (280 gm/10 oz) all-purpose (plain) flour
3 teaspoons  (15 gm) (1/2 oz) baking powder (I used single-acting, because it's aluminum-free, and it turned out fantastic)
1 1/2 cups (300gm) brown sugar, firmly packed
3/4 cup (170 gm/6 oz) butter, preferably unsalted, cubed
1/2 cup  (55 gm/2 oz) walnutor almond or pecan pieces, 
1 to 1-1/2 teaspoons (5 to 7 ½ ml) (5 to 8 gm) ground nutmeg - freshly grated is best if you have it
1/2 teaspoon mixed spice
1 teaspoon (5ml) vanilla extract
1 ripe banana or 1 egg (or both)

 Directions
1. Preheat your oven to moderate 350°F/175°C/gas mark 4 .
2. Mix the bi- carb (baking soda (not baking powder) into the milk. Set aside.
3. Put the flour, baking powder and the brown sugar into your food processor. Pulse until uniformly mixed.
4. Add the cubed butter. Pulse until you have evenly sized crumbs.
5. Place 2 1/2 cups of the crumbs into the well greased springform (9”/23cm) pan. Press the crumbs evenly over the base and up the sides for 2 or 3 cms (1 inch) using your fingers.
6. Add the banana or egg, spices and vanilla to  the rest of the crumbs in the food processor.
7. Pour in the milk and baking soda mixture. Mix until it is just smooth.
8. Pour the batter over the crust in the springform pan.
9. Gently sprinkle the nut pieces over the batter.
10. Bake in a preheated moderate oven for 30-40 minutes. It's ready when the top is golden brown and a skewer is clean when it comes out.
11. Cool the cake in the pan for 10 minutes and then take the springform part off. Leave it on the base until cooled.

Thursday, March 29, 2012

March 2012 Daring Bakers' Challenge - Potato and Rosemary Crackle or Dutch-Crunch Bread

Sara and Erica of Baking JDs were our March 2012 Daring Baker hostesses! Sara & Erica challenged us to make Dutch Crunch bread, a delicious sandwich bread with a unique, crunchy topping. Sara and Erica also challenged us to create a one of a kind sandwich with our bread!

Recipe Source: The recipe for the Dutch Crunch topping came from Rose Levy Beranbaum’s The Bread Bible. The recipes for the breads we’ve suggested came from The Bread Bible and an adaptation of a recipe found on bakingbites.com


I decided to make my own variation so it would be egg free. The recipe below makes a 35cm x 25 cm tray. That's a lot of bread. The dutch crunch directions are straight from Sara and Erica.

I created a lot of sandwiches etc with the bread, I was a slacker with the photos though.
My favorite dish that I will recreate was made with the last of the bread. I buttered the bread well and fried it. Once it was beautifully golden I took it out of the pan and cut it into quarters.
then I whipped up 3 eggs with a tablespoon of cream, finely chopped parsley and dill and 1/4 cup diced smoked salmon.
Back into the pan with the bread and and then I poured the egg mixture around the bread. when it had set on the bottom I flipped the whole lot over and cooked the other side. It was amazing with a little sour cream drizzled over the top.


Potato and Rosemary Dutch Crunch Bread
Preparation Time: 30 minutes + 3 rises of approximately 1 hour
Cook Time: 45 minutes
Ingredients:
  • 3/4 cup water from the potatoes or 3/4 cup of milk
  •  1 cupcooked potato
  • 1 tablespoon sugar
  • 2 tablespoons butter or oil
  • 3 cups plus 1 cups plain flour
  • 3 tablespoons finely chopped fresh  rosemary or 1 tablespoon dried rosemary.
  • 1 package (2 1/4 teaspoons) active dry or instant yeast (not rapid rise)
  • 1 teaspoon salt
Preparation:
·       Peel and cut the potatoes into 2 cm cubes and boil until soft.
·       While the potatoes are still hot add the sugar, potato water or milk and butter, and mix by hand.allow to cool to lukewarm.
·       In a separate bowl mix 3 cups of the flour, yeast, and salt and combine with potato mixture and mix well. Cover and set in a warm place until it has doubled about 1 – 1 ½ hours.
·       Add remaining 1 cup flour and, using the dough-hook attachment, knead for 7 minutes (or 10 minutes by hand). Place the dough in a clean, greased bowl, cover and let it rise until doubled.
·       Punch down the dough, press it into a 25cm x 30cm baking tin, let the bread rise until half risen. Cover with the tiger topping and let it rise until for at least another 15 minutes or until double the pre risen thickness. Bake 45 minutes in a pre-heated oven to 180° Celsius degrees.


Dutch Crunch Topping

Ingredients
·       2 tablespoons (2 packets) (30 ml) (15 gm/½ oz) active dry yeast
·       1 cup (240 ml) warm water (105-115º F) (41-46°C)
·       2 tablespoons (30 ml) (30 gm/1 oz) sugar
·       2 tablespoons (30 ml) vegetable oil
·       ½ teaspoon (2½ ml) (3 gm) salt
·       1½ cups (360 ml) (240 gm/8½ oz) rice flour (white or brown; NOT sweet or glutinous rice flour)
Directions:
1. Combine all ingredients in a large bowl and beat with a whisk; beat hard to combine. The consistency should be like stiff royal icing – spreadable, but not too runny. If you pull some up with your whisk, as shown below, it should drip off slowly. Add more water or rice flour as necessary. Let stand 15 minutes.
2. Coat the top of each loaf or roll with a thick layer of topping. We tried coating it with a brush but it worked better just to use fingers or a spoon and kind of spread it around. You should err on the side of applying too much topping – a thin layer will not crack properly.
3. Let stand, uncovered, for any additional time your recipe recommends. With the Soft White Roll, you can place the rolls directly into the oven after applying the topping. With the Brown Rice Bread, the loaves should stand for 20 minutes with the topping before baking.
4. When baking, place pans on a rack in the center of the oven and bake your bread as you ordinarily would. The Dutch Crunch topping should crack and turn a nice golden-brown color.

Saturday, March 10, 2012

Egg-Less Zuchinni And Lemon Loaf

The Daring Bakers’ February 2012 host was – Lis! Lis stepped in last minute and challenged us to create a quick bread we could call our own. She supplied us with a base recipe and shared some recipes she loves from various websites and encouraged us to build upon them and create new flavor profiles.

Lis gave a couple of recipes and for more information on that you'll have to join the Daring Kitchen.

I didn't use any of those because No 2 son can't eat eggs.

Instead I adapted and fiddled and plotted and made the following recipe, then forgot to take a photo of it.


Zucchini and Lemon Loaf
Ingredients:

·        Grated rind of 1 lemon
·        2 cups sugar
·        ¾ cup vegetable oil
·        3 cups self-raising flour , sifted
·        2 cups zucchini (finely grated)
·        2 teaspoons vanilla
·        Juice of the lemon with enough milk added to make ¾ cup
·        1 teaspoon bi-carb (baking) soda
·        1 teaspoon salt
·        2 teaspoons mixed spice
·        ½ cup cocoa nibs
·        ¾ cup pecans or almonds – chopped into small bits
·        Grated rind and juice of 1 (another) lemon
·        ½ cup white sugar
Directions:
·       Preheat oven to 175° Celsius.
·       Grease two 9×5 inch (23×13 centimeter) loaf pans and place a strip of bake paper length wise, up over the ends with some overhang in each tin. This makes lifting the cool cakes out easier.
·       Place milk and lemon juice into a medium sized mixing bowl.
·       Add sugar and blend until creamy and slightly thick.
·       Add oil and mix well.
·       Add zucchini, vanilla, and nuts. Stir well.
·       Sift flour, mixed spice, baking powder, soda, and salt into another medium bowl.
·       Stir the dry ingredients into the wet ingredients a couple of spoonful’s at a time until nicely combined.
·       Pour the 'batter' into loaf pans, and put into the oven.
·       Bake for 1 hour (60 minutes) and check to see if it is done (a skewer inserted should come out clean and the sides should have pulled away from the tin).
·       If you need to leave it in for any additional time cover loosely with some foil so the top does not overcook.
·       It is not unusual for quick bread such as this to crack along the top.
·       Mix the extra juice, rind and sugar in a small saucepan. Stir over low heat until the sugar melts and the mixture bubbles.
·       Take the cakes out of the oven and pour half the syrup over each cake. Leave the cakes in the tins to cool. Lift out with the baking paper.

Sunday, January 29, 2012

Daring Kitchen Scones

This month  Audax Artifex was our January 2012 Daring Bakers’ host. Audax worked tirelessly to master light and fluffy scones (a/k/a biscuits) to help us create delicious and perfect batches in our own kitchens!

I do consider myself an above average scone cook so I am happy to say my recipe is the same as Audax's. I never use lard as he did as The Husband is a vegetarian.

I am also a champion scone eater which is one of the reasons I got up to over 100 kilos.
Happily after 2 years of real effort I am down to just under 80 kilos and to stay that way I have had to limit my scone intake.

The husband is one of those horrible males who still weighs the same as he did the day we got married. Damn his metabolism. No 2 son has inherited those genetics, so these days I make scones for them and just have a mouthful. It's hard to just have a mouthful of a warm scone.

For the challenge I made the plain scones supersized and The husband and No 2 son had them as hamburger buns.


I also made a cheese and chive scone round and they ate that "As Is" claiming it needed nothing with it. As they ate the whole thing who am I to argue.


The crumb was fine and bread like, which is how I like my scones. If you would like to read the whole detailed, I can safely say, scientific research that Audax went through he has blogged about it on his blog Audax Artifex

These recipes are as Audax wrote them and are his work not mine. Thank you Audax for all the hard work.

Basic Scones (a.k.a. Basic Biscuits)
Servings: about eight 2-inch (5 cm) scones or five 3-inch (7½ cm) scones
Can be doubled

Preparation time: Preparation time less than 10 minutes. Baking time about 10 minutes.
Equipment required:
 Large mixing bowl
 Baking dish
 Measuring cups and spoons (optional)
 Flour Sifter (optional)
 Board (optional)
 Scone (biscuit) cutter (optional) or knife (optional)
 Dough scraper (optional)
 Spatula (optional)
 Weighing scale (optional)
 Cooling rack (optional)
 Pastry brush (optional)


Ingredients
1 cup (240 ml) (140 gm/5 oz) plain (all-purpose) flour
2 teaspoons (10 ml) (10 gm) (1/3 oz) fresh baking powder
¼ teaspoon (1¼ ml) (1½ gm) salt
2 tablespoons (30 gm/1 oz) frozen grated butter (or a combination of lard and butter)
Approximately ½ cup (120 ml) cold milk
Optional 1 tablespoon milk, for glazing the tops of the scones

Directions:
1. Preheat oven to very hot 475°F/240°C/gas mark 9.
2. Triple sift the dry ingredients into a large bowl. (If your room temperature is very hot refrigerate the sifted ingredients until cold.)
3. Rub the frozen grated butter (or combination of fats) into the dry ingredients until it resembles very coarse bread crumbs with some pea-sized pieces if you want flaky scones or until it resembles coarse beach sand if you want tender scones.
4. Add nearly all of the liquid at once into the rubbed-in flour/fat mixture and mix until it just forms a sticky dough (add the remaining liquid if needed). The wetter the dough the lighter the scones (biscuits) will be!
5. Turn the dough out onto a lightly floured board, lightly flour the top of the dough. To achieve an even homogeneous crumb to your scones knead very gently about 4 or 5 times (do not press too firmly) the dough until it is smooth. To achieve a layered effect in your scones knead very gently once (do not press too firmly) then fold and turn the kneaded dough about 3 or 4 times until the dough has formed a smooth texture. (Use a floured plastic scraper to help you knead and/or fold and turn the dough if you wish.)
6. Pat or roll out the dough into a 6 inch by 4 inch rectangle by about ¾ inch thick (15¼ cm by 10 cm by 2 cm thick). Using a well-floured 2-inch (5 cm) scone cutter (biscuit cutter), stamp out without twisting six 2-inch (5 cm) rounds, gently reform the scraps into another ¾ inch (2 cm) layer and cut two more scones (these two scones will not raise as well as the others since the extra handling will slightly toughen the dough). Or use a well-floured sharp knife to form squares or wedges as you desire.
7. Place the rounds just touching on a baking dish if you wish to have soft-sided scones or place the rounds spaced widely apart on the baking dish if you wish to have crisp-sided scones. Glaze the tops with milk if you want a golden colour on your scones or lightly flour if you want a more traditional look to your scones.
8. Bake in the preheated very hot oven for about 10 minutes (check at 8 minutes since home ovens at these high temperatures are very unreliable) until the scones are well risen and are lightly coloured on the tops. The scones are ready when the sides are set.
9. Immediately place onto cooling rack to stop the cooking process, serve while still warm.

Variations on the Basic recipe
Buttermilk – follow the Basic recipe above but replace the milk with buttermilk, add ¼ teaspoon of baking soda, increase the fat to 4 tablespoons, in Step 3 aim of pea-sized pieces of fat coated in flour, in Step 5 fold and turn the dough, rounds are just touching in the baking dish, glaze with buttermilk.

Australian Scone Ring (Damper Ring) – follow the Basic recipe above but decrease the fat to 1 tablespoon, in Step 3 aim of fine beach sand sized pieces of fat coated in flour, in Step 5 knead the dough, in Step 7 form seven rounds into a ring shape with the eighth round as the centre, glaze with milk.

Cheese and Chive – follow the Basic recipe above but add ¼ teaspoon of baking soda, after Step 2 add ½ teaspoon sifted mustard powder, ¼ teaspoon sifted cayenne pepper (optional), ½ cup (60 gm/2 oz) grated cheese and 2 tablespoons finely chopped chives into the sifted ingredients, in Step 3 aim of beach sand sized pieces of fat coated in flour, in Step 5 knead the dough, rounds are widely spaced in the baking dish, sprinkle the rounds with cracked pepper.

Fresh Herb – follow the Basic recipe above but after Step 3 add 3 tablespoons finely chopped herbs (such as parsley, dill, chives etc).

Sweet Fruit – follow the Basic recipe above but after Step 3 add ¼ cup (45 gm) dried fruit (e.g. sultanas, raisins, currents, cranberries, cherries etc) and 1 tablespoon (15 gm) sugar.

Wholemeal – follow the Basic recipe above but replace half of the plain flour with wholemeal flour.

Wholemeal and date – follow the Basic recipe above but replace half of the plain flour with wholemeal flour and after Step 3 add ¼ cup (45 gm) chopped dates and 1 tablespoon (15 gm) sugar.


Tuesday, May 31, 2011

Piped Shortbread Cookies

Piped Shortbread Cookies.
I have written another article for Food Talk on the Daring Kitchen. Here it is for you.

An invaluable part of every cooks repertoire are small things like cookies. As a light snack, after dinner with coffee or a thoughtful hostess gift when visiting friends, the thoughtfulness of something handmade lets others know how much we value them.
One of my favourite cookies is shortbread. If I am out and there is a plate of cookies I will go for the shortbread (if it is homemade I am not a fan of the Danish ones in the blue tins).
While shortbread has its origins in Scotland other European countries have a long history of making similar cookies. For example in Sweden another popular shortbread type recipe is called ‘drömmar’, literally meaning dreams. The main difference between the Scottish shortbread and the Swedish ‘drömmar’ is the butter is browned by placing the butter in a large heavy pan and cooking it over medium-low heat without stirring for about 15 minutes, or until butter is a light tan colour.

Scottish shortbread is a type of unleavened cookie which was traditionally made from one part white sugar, two parts butter, and three parts oatmeal flour. Today plain white (wheat) flour is most commonly used. Adding other ingredients such as cornflour alters the texture. You can substitute gluten free flours very successfully.

Shortbread was named because of its crumbly texture (from an old meaning of the word short). The cause of this texture is its high fat content, provided by the butter. The short or crumbly texture is a result of the fact that the fat inhibits the formation of long protein gluten strands. The related word "shortening" refers to any fat that may be added to produce a short or crumbly texture. That’s why you can beat it for ten minutes and it doesn’t get tough. Shortbread cookies hold their shape under pressure, if you just combine the mixture until it holds together you can press it out into large rounds or slabs cut to shape and cook it and it will be a delicious solid cookie that is perfect for lunch boxes.

For something a bit special you can pipe it. To do this you have to beat it. What is the difference you might ask? My favourite recipe says to beat it for ten minutes. I wondered ‘is that was really necessary?’
After some experimentation I can say yes it is.
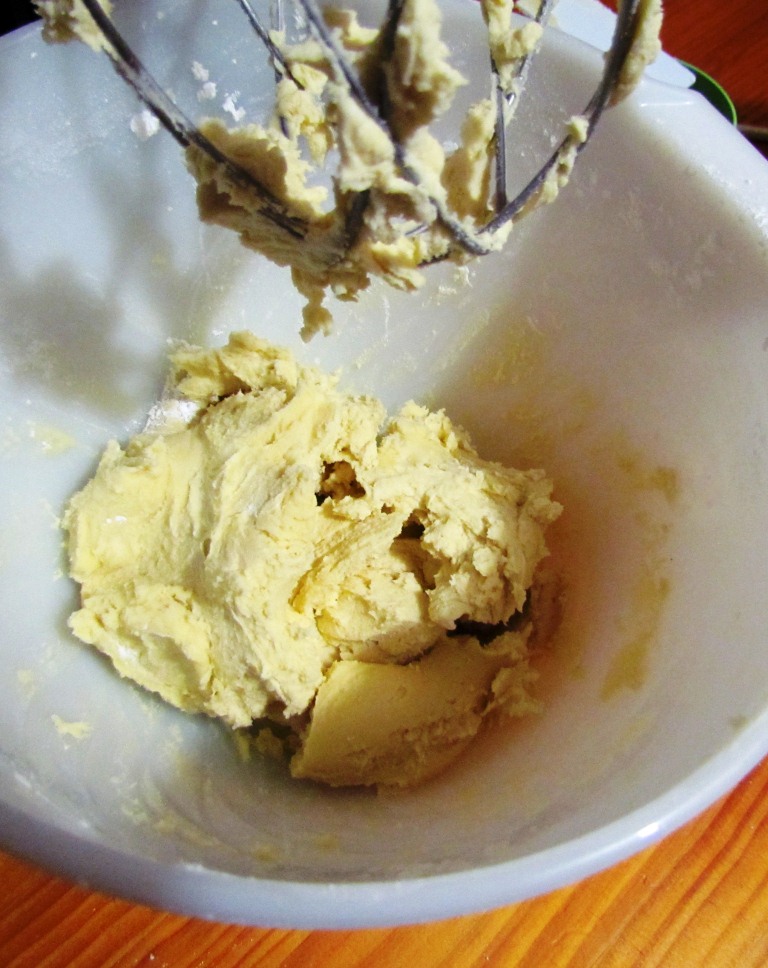
I mixed the ingredients in the recipe below until just combined. This took about two minutes.

It hadn’t changed colour as you can see but it was holding together. It was really hard to pipe and after cooking the cookies were flatter. This is the stage I would press it out into a disc or slab, cut and cook. Traditionally the slabs and discs were cut after cooking but I like to cut it before.

After five minutes of beating the mixture was lighter, easier to pipe and held their shape a little more.
After ten minutes of beating it was very pale, light, easy to pipe and it held the ridges from the piping much better during the cooking.

As the mixture in the bag and bowl warmed it held its shape less while cooking so next time I will put it in the refrigerator between trays.

After about eight minutes in my oven the cookies were ready. Below is the finished result.
The photo below shows the results of the different amounts of beating after the cookies are cooked. Above the number 2 are cookies after two minutes of beating, above the 5 the five minutes of beating and the ones on the right are the after ten minutes of beating.


Piped Shortbread Cookies/Biscuits
When piped to about 2.5 cm/1 inch this recipe makes approximately 120 cookies.
Ingredients
• 1 cup, 250 grams softened butter
• 1 ¼ cups, 185 grams all-purpose flour
• ½ cup, 75 grams confectioners' sugar
• ¼ cup, 45 grams cornflour
• 2 teaspoons vanilla essence
• Nuts, chocolate chips, maraschino cherries
Directions
1. Preheat oven to 350 ° F (180 °C.)
2. Combine butter, flours, vanilla and confectioner's sugar and beat for 10 minutes.
3. Drop from teaspoon onto cookie sheet or pipe a shape. Decorate with maraschino cherry pieces or something else tasty.
4. Bake in preheated oven for 15 to 18 minutes, or until bottoms are lightly browned.
Drömmar
Makes approximately 100 cookies
Ingredients
• 1 1/2 cups, 375grams butter
• 3/4 cup, 150 grams white sugar
• 2 teaspoons vanilla extract
• 1 teaspoon ground cinnamon
• 2 ½ cups, 375 grams all-purpose flour
• 50 -100 blanched whole almonds, toasted
Directions
1. Preheat oven to 350 °F /180 °C.
2. Place butter in a large heavy skillet and cook over medium-low heat without stirring for about 15 minutes, or until butter is a light tan color. Pour all of it, including the solid bits into mixing bowl. Cool at room temperature until firm.
3. Place browned butter, sugar, vanilla and cinnamon into your mixer bowl and beat until combined. Stir in flour and then beat for 3 minutes. If you want too pipe the cookies beat the dough for 10 minutes.
4. Shape dough into 1-inch balls. Place 1 inch apart on an lined baking trays. Top each with an almond; press almond slightly into dough.
5. Bake for 12 - 15 minutes or until golden brown. Remove to wire rack and cool.

Tuesday, March 15, 2011

THE DARING COOKS’ MARCH, 2011 CHALLENGE: ¡ME ENCANTA PERÚ! CEVICHE & PAPAS RELLENAS

I am really enjoying being a member of The Daring Kitchen even though I have a lot of professional and home experience in the cooking department sometimes it is just too hard too come up with new ideas so having someone give them to me is really great.

Kathlyn of Bake Like a Ninja was our Daring Cooks’ March 2011 hostess. Kathlyn challenged us to make two classic Peruvian dishes: Ceviche de Pescado from “Peruvian Cooking – Basic Recipes” by Annik Franco Barreau. And Papas Rellenas adapted from a home recipe by Kathlyn’s Spanish teacher, Mayra.


Recipe Source: Ceviche de Pescado from “Peruvian Cooking – Basic Recipes” by Annik Franco Barreau. Papas Rellenas adapted from a home recipe by my Spanish teacher Mayra. Vegan Papas Rellenas recipe adapted from the Vegan Good Eats blog (http://vegangoodeats.com/2010/05/papa-rellena/), written by Joel Luks. The Salsa Criolla recipe also comes from Joel’s blog.

Papas Rellenas, Kathlyn referred to them as 'essentially a clever way to use up leftover potatoes. The filling is usually made with beef, but I’ve got an alternative recipe that should work for both vegetarians and vegans'. they are so much more, in our house there are no leftover potatoes unless they are planned leftovers. so I jumped into these pretty damn quick let me tell you.
I didn't make the ceviche, I don't mind this type of seafood but The Husband is not a fan so I didn't do it yet. There were a few variations done by members where they cooked the seafood first and that is certainly on the cards for the future.

I did however make three variations of the Papas Rellenas. All I can say is "WOW". they were so good. Stuffed Fried potato croquettes is the closest thing to these but these were so much better. I am putting these on the top of the favorite comfort food pile let me tell you.
So let me present to you Papas Rellenas

Time taken/needed
Papas rellenas – total time, 5+ hours - There is a lot of cooling/setting time in there.
Boiling and cooling potatoes: 2 hours
Preparing filling: 1 hour (can be done as potatoes cool)
Preparing dough: 30 minutes
Shaping and filling papas: 30 minutes
Chilling in the refrigerator to set the crumbs: 30 - 60 minutes
Frying papas: 20-30 minutes (depending on how many batches)

Equipment Required
For the Papas Rellenas
Potato ricer (recommended) or a potato masher
Pan capable of holding 2” (50 mm) of oil for frying the Papas (small dutch oven is ideal)
Frying pan for cooking filling(s)
Medium mixing bowl
Three smaller bowls or pie pans
Measuring cups and spoons
Pot for boiling potatoes

Papas Rellenas (de carne):
Makes 6
Ingredients
For the dough:
2¼ lb (1 kg) russet or a good mashing potato (Theres a table here to give you some information)
1 large egg

For the filling:
2 tablespoon (30 ml) of a light flavored oil
½ lb (250 grams) finely chopped mushrooms or fine mince steak
6 black olives, pitted and chopped (use more if you love olives)
1 small onion, finely diced (about 1 cup (240 ml))
½ cup (120 ml) (90 gm) (3 oz) sultanas, soaked in 1 cup (240 ml) boiling water for 10 minutes, then chopped
1 finely diced capsicum (ok to sub jalapeño or other pepper – if you are shy about heat, use less)
2 cloves garlic, minced or passed through a press (if you love garlic, add more)
1 teaspoon (5 ml) (4 gm) (1/8 oz) ground cumin (use more if you like cumin)
½ teaspoon (2.5 ml) (2 gm) (1/16 oz) sweet paprika
¼ c. white wine, water or beef stock for deglazing
½ cup tomato chutney
Salt and pepper to taste

For the final preparation:
1 large egg, beaten
1 cup (240 ml) (140 gm) (5 oz) all-purpose flour
Dash cayenne pepper
Dash salt
1 cup dry (240 ml) (110 gm) (4 oz) or fresh (240 ml) (60 gm) (2 oz) cornflake or bread crumbs (you can use regular, panko, make your own or use store-bought. I used the cornflake crumbs, mainly because I had them in the pantry.
Rice Bran Oil for frying (enough for 2” (50 mm) in a heavy pan like a medium sized dutch oven)

Directions:
For the dough:
1. Boil unpeeled potatoes whole until tender when stuck with a fork. Let potatoes cool.
2. When potatoes are cooled, peel them and either mash them with a potato masher or force them through a potato ricer (preferred).
3. Add cornstarch, salt and pepper and knead “dough” thoroughly to ensure that ingredients are well combined and uniformly distributed.


While potatoes are cooling, make filling:
1. Caramelize onions in olive oil for about 5 minutes.
2. Add the garlic and chili pepper and cook.
3. Add the cumin and paprika and cook briefly (a few seconds).
4. Add the mushrooms or meat and cook until soft.
5. Add the sultanas.
6. Deglaze the pan with white wine and chutney.
7. Season with salt and pepper.
8. Allow filling to cool before forming “papas.”

Finishing the dough and forming the papas:
9. Use three small bowls (or other shallow containers) to prepare the papas. In one, combine flour, cayenne and salt. In the second, combine the egg replacer and water. Put bread crumbs in the third
10. Flour your hands and scoop up 1/6 of the total dough to make a round pancake with your hands. Make a slight indentation in the middle for the filling.
11. Spoon a generous amount of filling into the center and then roll the potato closed, forming a smooth, potato-shaped casing around the filling. Repeat will all dough (you should have 6 papas)
12. Heat 1 ½ - 2 inches (4 – 5 cm) of oil in a pan to about 350 – 375° F (175 - 190°C).


13. Dip each papa in the three bowls to coat: first roll in flour, then dip in egg replacer, then roll in bread crumbs, then repeat the egg and bread crumbs


14. Fry the papas (in batches if necessary) about 2-3 minutes until golden brown. Flip once in the middle of frying to get both sides.


15. Drain on a cooling rack over paper towel, this stops them going soggy and keep them warm in a low oven 200°F (95°C) (gas mark ¼) if frying in batches


For my second version I used some lentil burgers I had frozen earlier in the year. This is the best Lentil Burger Recipe ever. I got it years ago from my sister in law and it is a staple in our house. Even our carnivore friends love it.


Lentil Burger Recipe.
500g/1 pound Green-Brown Lentils (this is a type of lentil it doesn't mean green or brown. If you can't get these use a mixture of green and brown lentils)
1 kilogram/2pounds Potato (ponitac,pink eye or sebagoes work best)– peeled, cut into large chunks
375 grams/12 ounces Crunchy Peanut Butter
500 grams/1 pound Onion – Peeled and finely diced
60 mls/2 tablespoons Olive Oil
1 teaspoon Crushed garlic
1 teaspoon Powdered cumin
½ bunch Fresh coriander – washed and finely chopped
2 Eggs – beaten or for the vegans if the mixture is not holding together add 1/2 cup plain wheat, cornflour or tapioca flour. Mix until it does hold together.
Chilli - optional To taste

Directions
Put potatoes into a large pot and cover with plenty of cold water and bring to the boil.
When the water boils add the lentils and cook until the potatoes are soft enough to mash. Drain off excess water.
While the potatoes and lentils are boiling fry onion, cumin and chilli until the onion is cooked.
Add to drained and mashed potato/lentil mix with coriander.
Mix well and allow to cool.
Add egg and mix well.
Form into patties. Freezes well. Can be panfried or reheated in oven. Also good cooked in a loaf tin in 180° C oven and then sliced.
* If just using brown lentils add ½ cup plain flour with eggs.

I used these the same way I did the mash potato dough.


For the third variation I used the mashed potato dough and stuffed them with creme fraiche sprinkled with dried dill and wrapped in smoked salmon.

We had them as is, with a dollop of creme fraiche and lemon. They were so delicous.
I do love The Daring Kitchen. If you want to see more I keep telling you if you haven't already joined then you'll just have to go and do so.

Monday, February 14, 2011

Daring Cooks Tempura Challenge


The February 2011 Daring Cooks’ challenge was hosted by Lisa of Blueberry Girl. She challenged Daring Cooks to make Hiyashi Soba and Tempura. She has various sources for her challenge including japanesefood.about.com, pinkbites.com, and itsybitsyfoodies.com
I didn't make the Soba Noodle Salad but I have made it before. It is delicous. I did make the Tempura - vegetables, fish and prawns. So delicous. I used Lisa's recipe exactly and it worked perfectly.
Preparation time:
Soba
10 Minutes for the sauce
10 Minutes for the noodles
30 Minutes for Vegetable Preparation
5 Minutes to Serve
Depending on you, I can make this meal, from walking in the door after work to sitting down to eat in under 30 minutes, so it should be pretty quick.
Tempura
20 minutes vegetable preparation
10 minutes making the batter
30 minutes frying time
Again it depends how much your making and what equipment your using.
Equipment required:
 A Saucepan
 A colander
 Large Bowls
 Small bowls
 Ice
 A Knife
 A chopping Board
 A Deep pan for frying
 Oil for frying
 Small tongs or Chopsticks
 Covered container for shaking dipping sauce

Hiyashi Soba:
Recipes courtesy of Globetrotter Diaries and About.com-Japanese Food
Serves 4
Soba Noodles:
Ingredients
2 quarts (2 L) water + 1 cup cold water, separate 12 oz (340 g) dried soba (buckwheat) noodles (or any Asian thin noodle)
Directions:
Cooking the noodles:
1. Heat 2 quarts of water to a boil in a large pot over high heat. Add the noodles a small bundle at a time, stirring gently to separate. When the water returns to a full boil, add 1 cup of cold water. Repeat this twice. When the water returns to a full boil, check the noodles for doneness. You want to cook them until they are firm-tender. Do not overcook them.
2. Drain the noodles in a colander and rinse well under cold running water until the noodles are cool. This not only stops the cooking process, but also removes the starch from the noodles. This is an essential part of soba noodle making. Once the noodles are cool, drain them and cover them with a damp kitchen towel and set them aside allowing them to cool completely.

Mentsuyu - Traditional dipping sauce:
Ingredients
2 cups (480ml) Kombu and Katsuobushi dashi Or a basic vegetable stock.
1/3 cup (80 ml) soy sauce or a low sodium soy sauce
1/3 cup (80 ml) mirin (sweet rice wine)

Directions:
1. Put mirin in a sauce pan and heat gently. Add soy sauce and dashi soup stock in the pan and bring to a boil. Take off the heat and cool. Refrigerate until ready to use.
Spicy Dipping Sauce:
Ingredients
¾ cup 70gm/2½ oz spring onions/green onions/scallions, finely chopped 3 tablespoons (45 ml) soy sauce 2 tablespoons (30 ml) rice vinegar ½ teaspoon (2½ ml) (4 ⅔ gm) (0.16 oz) granulated sugar ¼ teaspoon (1¼ ml) (1/8 gm) (0.005 oz) English mustard powder 1 tablespoon (15 ml) grape-seed oil or vegetable oil 1 tablespoon (15 ml) sesame oil (if you can’t find this just omit from recipe.) Sea salt and freshly ground black pepper to taste - roughly 1/3 a teaspoon of each
Directions:
1. Shake all the ingredients together in a covered container. Once the salt has dissolved, add and shake in 2 tablespoons of water and season again if needed.
Common Hiyashi Soba Toppings:
Thin omelet strips
Ham
Boiled chicken breasts
Cucumber
Boiled bean sprouts
Tomatoes
Toasted nori (Dried Seaweed) Green onions Wasabi powder
Finely grated daikon (Japanese radish)
Beni Shoga (Pickled Ginger)
All toppings should be julienne, finely diced or grated. Prepare and refrigerate covered until needed.
Serving:
Traditionally soba is served on a bamboo basket tray, but if you don’t have these, you can simply serve them on a plate or in a bowl. Divide up the noodles, laying them on your serving dishes. Sprinkle each one with nori. In small side bowl or cup, place 1/2 cup (120 ml) of dipping sauce into each. In separate small side dishes, serve each person a small amount of wasabi, grated daikon, and green onions.
The noodles are eaten by sprinkling the desired garnishes into the dipping sauce and eating the noodles by first dipping them into the sauce. Feel free to slurp away! Oishii!

Tempura
Recipes courtesy of pink bites and itsy bitsy foodies
Serves 4
Ingredients
1 egg yolk from a large egg
1 cup (240 ml) iced water
½ cup (120 ml) (70 gm) (2½ oz) plain (all purpose) flour, plus extra for dredging
½ cup (120 ml) (70 gm) (2½ oz) cornflour (also called cornstarch)
½ teaspoon (2½ ml) (2½ gm) (0.09 oz) baking powder
oil, for deep frying preferably vegetable
ice water bath, for the tempura batter (a larger bowl than what will be used for the tempura should be used. Fill the large bowl with ice and some water, set aside)
Very cold vegetables and seafood of your choice ie:
 Sweet potato, peeled, thinly sliced, blanched
 Carrot, peeled, thinly sliced diagonally
 Pumpkin, peeled, seeds removed, thinly sliced blanched
 Green beans, trimmed
 Green bell pepper/capsicum, seeds removed, cut into 2cm (¾ inch)-wide strips
 Assorted fresh mushrooms
 Eggplant cut into strips (traditionally it’s fanned)
 Onions sliced
Directions:
1. Place the iced water into a mixing bowl. Lightly beat the egg yolk and gradually pour into the iced water, stirring (preferably with chopsticks) and blending well. Add flours and baking powder all at once, stroke a few times with chopsticks until the ingredients are loosely combined. The batter should be runny and lumpy. Place the bowl of batter in an ice water bath to keep it cold while you are frying the tempura. The batter as well as the vegetables and seafood have to be very cold. The temperature shock between the hot oil and the cold veggies help create a crispy tempura.

2. Heat the oil in a large pan or a wok. For vegetables, the oil should be 320°F/160°C; for seafood it should be 340°F/170°C. It is more difficult to maintain a steady temperature and produce consistent tempura if you don’t have a thermometer, but it can be done. You can test the oil by dropping a piece of batter into the hot oil. If it sinks a little bit and then immediately rises to the top, the oil is ready.
3. Start with the vegetables, such as sweet potatoes, that won’t leave a strong odor in the oil. Dip them in a shallow bowl of flour to lightly coat them and then dip them into the batter. Slide them into the hot oil, deep frying only a couple of pieces at a time so that the temperature of the oil does not drop.
4. Place finished tempura pieces on a wire rack so that excess oil can drip off. Continue frying the other items, frequently scooping out any bits of batter to keep the oil clean and prevent the oil (and the remaining tempura) from getting a burned flavor.
5. Serve immediately for the best flavor, but they can also be eaten cold.
Additional Information:
Great instructions on preparing the noodles
http://www.justhungry.com/basics-cold-soba-noodles-dipping-sauce
How to make Tempura Soba
http://www.youtube.com/watch?v=RD6Ut0JTZhs
Tempura
http://en.wikipedia.org/wiki/Tempura
Someone who did it well
http://globetrotterdiaries.com/recipes/zaru-soba-cold-soba-noodles-eating-japan
A collection of videos on how to prepare the vegetables for Tempura
http://www.ehow.com/video_2298709_ingredients-japanese-vegetable-tempura.html

Sunday, February 13, 2011

THE DARING BAKERS’ JANUARY, 2011 CHALLENGE: BISCUIT JOCONDE IMPRIME/ENTREMET


The January 2011 Daring Bakers’ challenge was hosted by Astheroshe from the Blog, accro. Accro is French for addicted.
She chose to challenge everyone to make a Biscuit Joconde Imprime to wrap around an Entremets dessert.
Joconde imprime /entremets. A joconde imprime (French Baking term) is a decorative design baked into a light sponge cake providing an elegant finish to desserts/torts/entremets/ formed in ring molds. A joconde batter is used because it bakes into a moist, flexible cake. The cake batter may be tinted or marbleized for a further decorative effect.
This Joconde/spongecake requires attentive baking so that it remains flexible to easily conform to the molds. If under baked it will stick to the baking mat. It over baked it will dry out and crack. Once cooled, the sponge may be cut into strips to line any shape ring mold.
Entremets (French baking term)- an ornate dessert with many different layers of cake and pastry creams in a mold, usually served cold. Think Trifle in a mold vs. a glass bowl.
A joconde imprime is the outside cake wrapper of the Entremets dessert.
Equipment required:
 Silpat
 ½ baking sheets or a 13” x 18” jelly roll sheet (rimmed baking sheet)
 Mixer (optional)
 Bowls
 Knives
 Offset spatula
 Regular spatula
 Pastry comb (optional)
 Rulers
 Spring form pan
 Biscuit cutter (or ring mold, or cut PVC pipe, or whatever else you can think of to mold individual desserts)
 Torte/ Entremets mold/ Springform pan/ Trifle dish (for larger desserts)
 Cling wrap
 Parchment paper
 Gel, paste or liquid food coloring (optional)

Joconde Sponge
YIELD: Two ½ size sheet pans or a 13” x 18” (33 x 46 cm) jelly roll pan
Ingredients:
¾ cup/ 180 ml/ 3oz/ 85g almond flour/meal - *You can also use hazelnut flour, just omit the butter
½ cup plus 2 tablespoons/ 150 ml/ 2⅔ oz/ 75g confectioners' (icing) sugar
¼ cup/ 60 ml/ 1 oz/ 25g cake flour
3 large eggs - about 5⅓ oz/ 150g
3 large egg whites - about 3 oz/ 90g
2½ teaspoons/ 12½ ml/ ⅓ oz/ 10g white granulated sugar or superfine (caster) sugar
2 tablespoons/ 30 ml/ 1oz / 30g unsalted butter, melted

Directions:
1. In a clean mixing bowl whip the egg whites and white granulated sugar to firm, glossy peeks. Reserve in a separate clean bowl to use later.
2. Sift almond flour, confectioner’s sugar, cake flour. (This can be done into your dirty egg white bowl)
3. On medium speed, add the eggs a little at a time. Mix well after each addition. Mix until smooth and light. (If using a stand mixer use blade attachment. If hand held a whisk attachment is fine, or by hand. )
4. Fold in one third reserved whipped egg whites to almond mixture to lighten the batter. Fold in remaining whipped egg whites. Do not over mix.
5. Fold in melted butter.
6. Reserve batter to be used later.

Patterned Joconde-Décor Paste
YIELD: Two ½ size sheet pans or a 13” x 18” (33 x 46 cm) jelly roll pan
Ingredients
14 tablespoons/ 210ml/ 7oz/ 200g unsalted butter, softened
1½ cups plus1½ tablespoons/ 385ml/ 7oz/ 200g Confectioners' (icing) sugar
7 large egg whites - about 7 oz / 200g
1¾ cup/ 420ml/ 7¾ oz/ 220g cake flour
Food coloring gel, paste or liquid
COCOA Décor Paste Variation: Reduce cake flour to 6 oz / 170g. Add 2 oz/ 60 g cocoa powder. Sift the flour and cocoa powder together before adding to creamed mixture.
Directions:
1. Cream butter and sugar until light and fluffy (use stand mixer with blade, hand held mixer, or by hand)
2. Gradually add egg whites. Beat continuously.
3. Fold in sifted flour.
4. Tint batter with coloring to desired color, if not making cocoa variation.
Preparing the Joconde- How to make the pattern:
1. Spread a thin even layer of décor paste approximately 1/4 inch (5 millimeter) thick onto silicone baking mat with a spatula, or flat knife. Place mat on an upside down baking sheet. The upside down sheet makes spreading easier with no lip from the pan.
2. Pattern the décor paste – Here is where you can be creative. Make horizontal /vertical lines (you can use a knife, spatula, cake/pastry comb). Squiggles with your fingers, zig zags, wood grains. I spread the chocolate paste quite thin and dragged it with a toothed pastry thingy I have.
3. Slide the baking sheet with paste into the freezer. Freeze hard. Approx 15 minutes.

4. Remove from freezer. Quickly pour the Joconde batter over the design. Spread evenly to completely cover the pattern of the Décor paste.
5. Bake at 475ºF /250ºC until the joconde bounces back when slightly pressed, approx. 15 minutes. You can bake it as is on the upside down pan. Yes, it is a very quick bake, so watch carefully.
6. Cool. Do not leave too long, or you will have difficulty removing it from mat.
7. Flip cooled cake on to a powdered sugared parchment paper. Remove silpat. Cake should be right side up, and pattern showing! (The powdered sugar helps the cake from sticking when cutting.)

I used this for a cake for my daughter in laws baby shower.
I made a quarter of the decor paste and half the joconde sponge recipe to make the my tray full and then used the finished sheet of joconde to line a 9" springform tin.
Next I used a recipe from Renata's blog Testado,Provado e Aprovado for Tangerine Cake I didn't have any tangerines and I wanted to make a lemon cake so I substituted lemon for the tangerine. I didn't have any of the peel and I just used grated lemon rind. I also added a 1/4 teaspoon of natural lemon flavour as the lemons weren't as tasty as I would have liked.
Renata used a ring tin, I didn't want a ring tin as my plan was to cut the cake into layers so I used a 8 1/2" tin which was a perfect size to fit in the 9" springform tin after it was lined. One quantity of this cake was perfect.

I also used lemon curd, lemon pannacotta and in the center there is a layer of almond dacquoise. This used up the whites from the lemon curd.
The finished result is from the bottom up - a layer of lemon cake, a layer of lemon pannacotta, a layer of lemon curd, the almond dacquoise, lomon pannacotta, lemon curd, lemon cake, lemon pannacotta, lemon curd, joconde on the top and sides, yes I did make it upside down.
I didn't make enough of the joconde to line the sides of the ring properly. I patched together the bits. After the layering I covered the whole lot in gladwrap and let it set overnight. The last step was to turn it out and cover the sides of the cake with white chocolate ganache and ran lines of dark chocolate over it too echo the top which is the plain joconde.
Daring Bakers in a great web group, I have made things I haven't made before and things I have made and screwed up I have made successfully with the guidance of the wonderful members of this group

Sunday, January 9, 2011

The Daring Cooks October 2009 Challenge: Macarons


When I made Lemon and Passionfruit Curd I ended up with a lot of egg whites. The recipe calls for 9 egg yolks and 3 whole eggs so I knew I was going to end up with 9 egg whites.
I would really like to cook all the Daring Kitchen Challenge recipes so this seemed the ideal time to start with the Macarons. Macarons are so popular at the moment. They are supposedly difficult to make so I think I got really lucky. Ami of LAMonkey Girl used a claudia Fleming recipe that has a yeild of 120. I decided to use the recipe from "The MasterChef Cookbook volumn 2".
Callum has a recipe in there for Chocolate Delice served with Almond Macarons. They look lovely in the book and on the show. Other recipes are really complicated but this one is easy but a bit too sweet.
I used hazelnuts instead of almonds. I changed the amount of icing sugar in the recipe below from the original. The original recipe has double the amount of sugar and were too sweet for us and my taste testers at work. Ami of LAMonkey Girl hosted the Macaron challenge. The Daring Kitchen recipe has much less sugar but makes a larger amount. Mine made 60 halves so when they were sandwiched I ended up with 30.

Hazelnut Macarons

Ingredients

120 grams ground hazelnuts
215 grams icing sugar
3 egg whites (Room Temperature)
55 grams caster sugar
1/4 teaspoon creme of tarter
(There was supposed to be a drop of red food colouring but I left it out)

Method
Preheat the oven to 120° C.
Sift the nut meal and icing sugar three times. (My nut meal was too coarse even after blitzing in the food processor so I only sifted it once).
Whisk the egg whites to soft peaks. Gradually add the caster sugar, cream of tarter and food colouring. Whisk to stiff peaks. Fold in the nut/sugar mix until just combined (don't overmix).


Spoon into a piping bag with a plain 1 cm nozzle. Pipe 3cm rounds 3 cm apart onto 2 oven trays lined with bakepaper.


The recipe says it makes 40 I got closer to 60. Leave for 20 minutes and then bake for 30 minutes or until the macarons are easily moved on the paper. Remove from the oven and leave on the tray to cool.


I should have smoothed the tops more, it wasn't so obvious without my glasses that I still had a little peak on some of them. Oh well next time. They taste great.

Chocolate Italian Meringue Buttercream

1 egg white
55 grams sugar
1 teaspoon liquid glucose
60 grams butter
60 grams chocolate

Combine sugar, glucose and 2 tablespoons water in small saucepan.

Bring the sugar and water to a boil in a small saucepan. Cover with a lid and let boil for 2-3 minutes. Remove the lid and cook the sugar to 244 degrees, F.

While your syrup is boiling, whip the whites on medium speed of your stand mixer to soft peaks. This is a timing issue, so watch them carefully. If you overbeat your whites before your syrup reaches temperature, they'll be grainy. Adjust the speed of the mixer up or down and try and get your whites to the perfect consistency at the same time your sugar reaches 244F.

When the syrup is ready, with mixer on medium low, pour syrup in a thin stream down the inside of the mixing bowl. This will give the syrup a chance to cool off a bit as well as keeping the syrup from getting spun all over the sides of the mixer by the whisk attachment.

Turn mixer to high and whip until whites are completely cool and hold firm peaks.

Add the softened butter, a bit at a time making sure one addition is blended in before adding the next. After the butter add the cool melted chocolate and whisk until it is smooth and thoroughly incorporated. It might look a little curdled but just keep the mixer going and it will smooth out into a silky delight. Refrigerate to set and then pipe with a star nozzle onto half he macarons or jsut spread it on with a knife. You can leave a gap in the middle and fill it with your favorite jam.
I froze some of the filled macarons and they freeze beautifully and we eat them straight out of the freezer. The buttercream softens in our Australian heat and is a bit messy to eat. I will definitely made these again perhaps almond next time.